|
|
|
|
||
|
|
|
||
|
Wednesday - December 25, 2024
Dodge Dakota Door Handle Painting Page 4
31. Now comes the sanding and priming. Starting with 400 grit paper, sand the plastic uniformly. You should not sand it perfectly smooth at this point. This step is just to knock down the texture. I recommend using a sanding block or lay your hand/fingers as flat as possible to avoid sanding gouges into the plastic.
32. Once the parts have had the initial sanding, its time for the adhesion promoter. This step is one of the most critical, as it is what promotes the bonding of the paint to the plastic. Again, I used the Bulldog product. They have an Adhesion Promoter in an aerosol, or a Bond-Flex-Tie-Coat for gun spray.
33. Repeating the priming and sanding steps is actually what actually fills the texture and creates the smooth surface. I used Rubber-Seal Fill & Flex Primer #RS-515. (Check out http://www.rubber-seal.com/02clearcoats/primersurfacers.htm)
34. After priming and sanding 3 times, you get this
35. Now we are ready for the basecoat of color. 3 coats to cover everything
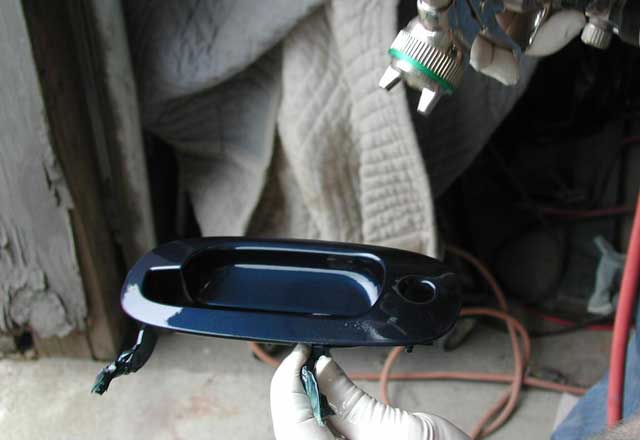
36. Next comes the clearcoat, 4 coats.
37. Here's what it looks like all done
38. At this point I wave my hands and through the magic of reading the removal and disassembly steps in reverse, the handles are put back together and reinstalled in the doors.
39. You could very well be done at this point. If you are happy with the final finish and it matches the finish of the door panel, as shown here, congratulations. Grab a lawn chair and beer and enjoy the fruits of your labor. I really recommend that most do-it-yourselfers either stop at this point or have a professional complete the following step. If you are not familiar with this process, it is extremely easy to burn through the new paint and ruin all of your good work. If however, you want a perfect mirror finish, its time to wet sand and buff. Start by soaking a piece of 2000 grit wet-or-dry paper in a bucket of water with a few drop of car wash soap mixed in. Then, making sure to keep the paper and the surface wet, sand the handle only until you have removed all of the orange peel and the surface has a uniform dull appearance. Note that I sanded only the outer surfaces. I would not recommend sanding the recessed area under the pull handle as it is too difficult to buff there to restore the gloss.
40. Buff the handle with a professional grade fine-cut rubbing compound such as 3M Perfect-It II. Machine buffing will produce the best results, but unless you have a buffer and are comfortable using hand rubbing will work.
41. OK, Now you're done. Congratulations.
|
|||||||||
|
Home | Forums | Members | Pictures | Contact Us This site is in no way affiliated with Chrysler or any of its subsidiaries.
| |||||||||